Accessories

Accessories

Saturday, 4 February 2017

Seasonal Expressions 1 Blog Hop

Welcome to our first Blog Hop for 2017! This month it's all about the Seasonal Expressions 1 Idea Book - if you haven't seen it yet you can check it out here.

For those of you who are new here, a blog hop is a big circle where you start at a blog post (like this one), and once you've read the post you click the link to go to the next one. You keep doing that until you end up back here 😊.

If you have come here from Kerry's Creative Collection, then you're right on track.

This month we are focusing on some of the amazing new products in our Seasonal Expressions 1 Idea Book. This Idea Book runs from January 1 until April 30, unless products are sold out sooner. So, if there's something you really really like, I would suggest you order it sooner rather than later.

Now, I have a confession to make. When I first got my copy of the Idea Book, I wasn't thrilled about some of the paper packs. I looked at them in the Idea Book and went "Meh." I still ordered them (I like to have them on hand for you guys - my favourite isn't always yours), but I left them sitting in the box. Then it came time to work on this blog post.

We were away all of January, so I hadn't really had much time to look at the products. I planned on showcasing the Hello Lovely papers. We were given that pack at our convention last year, and I thought it was beautiful. But then I thought I should pull all the other papers out and have a look at them.

OK, so I was totally wrong. And seeing something on a screen or in an Idea Book does not always do it justice. I love, love, LOVE these Sugar Rush products. The papers are beautiful, the Sugar Rush Dots are just the right touch of glittery, and the Sugar Rush Complements are really sweet! (Pun intended, lol). I also really love the Sugar Rush Cardmaking Thin Cuts Bundle, as I truly believe you can never, ever, have enough Thin Cuts!

So when you want it all, what do you do? Why, you get the Workshops Your Way scrapbooking kit of course! This kit contains the paper pack, the complements, the dots, and the Sugar Rush Washi Pack, as well as some coordinating cardstock. It gives you everything you need to make 3 double page layouts, as well as the paper needed to make 9 cards (the card bases are not included).

I love Workshops Your Way as they are so easy to follow to put together beautiful pages - no need to think about paper or photo placement, what colours match, where the title or journalling should go. Close To My Heart's design team have put together amazing layouts for you.

I haven't put photos on my layouts yet, but here are the pages I've done with white cardstock where the photos will go. You can also see the design guide here.


The little touches of embellishments are just so cute!

I also wanted to show you what you get leftover to use on other projects. The first picture shows you the decorative zip strips, the Picture My Life-style cards, and the left over paper.


This second picture shows you the stickers, embellishments, and washi tape left over. There is a heap there for you to use on more pages or cards.


I hope you've enjoyed having a look at my Sugar Rush. Now hop on over to Cindy's blog Cindy Scraps and see what she likes.

Wednesday, 1 February 2017

Happy New Year!

What? You mean it's way past Happy New Year time? Well, check this out:


Not really. I was away for all of January on an awesome family holiday, so I'm taking this opportunity to start the year off right. 😊

I hope you had a wonderful Christmas and New Year, and I look forward to seeing you at lots of crafting events this year!

Sunday, 4 September 2016

Copy that

Welcome to September's Scissors Paper Heart Blog Hop. This month the theme is 'Copy That'. Copy what? We have each chosen one of our favourite ideas from the new Annual Inspirations Idea Book and put our own twist on it.

For those who are new here, a Blog Hop is a big circle of blogs, linking to each other, all on the same theme. It allows you to get lots of great ideas going from one to the other. If you follow the circle from here you'll end up back here after checking out all the other ideas.

If you have arrived here from Kerry's Blog, Kerry's Creative Collection, then you're on the right track.

When I was flicking through the new Annual Inspirations Idea Book, this card on page 23 caught my eye. It was made using the new Adventure Fundamentals paper, and looked very cute!


Every year I give my daughter's teachers a card and some chocolate for Teacher's Appreciation Day, which is the last Friday in October. I thought this year I'd get organised early and get my cards done.

I looked at all our new range of Fundamentals paper, and chose the Whimsy Fundamentals pack to make my cards - it contains the sort of colours that my daughter loves, and since she'll be the one writing in the cards, why not :). This was paired with the Whimsy Ribbon Pack, of course, and matching cardstock.

I then pulled out one of my favourite stamps from this Ideas Book - the School Kids stamp set. The kids in it are just so cute, and I love all the other elements in it too - I can see it being used on school pages, on cards, on pages about my kids and their friends....just so many uses for it! The school house also looks a bit like a farmhouse to me too, and I have some farm visit photos in mind to use it with too.

Once I had my papers all sorted it was just a matter of sticking them all down. I used a White Daisy square of 3 1/4" x 3 1/4", a cardstock square of 3 1/2" x 3 1/2", and a patterned paper rectangle of 5 1/4" x 4".

I made 4 cards in total - 3 teacher thank you cards, and another thank you card for a friend, using the Birthday Princess stamp set. You will note that there is no sentiment stamped on my cards yet...that's because I'm waiting for my Short & Sweet stamp set to arrive. I love the Thank You on that set, and will mask it to put the Thank above the ribbon and the You underneath, as in the example.

So here are the four cards:


I coloured in the stamps using ShinHan markers, using this CTMH Marker Chart to match the colours. I also used multiple colours on the hair, faces, and legs of the stamps to add shading. See the close-ups below for the detail.


 All up, I used a lot of ShinHan markers, but I'm really happy with how they turned out. I used: Tender Pink, Barely Beige, Pastel Peach, Light Orange, Marigold, Golden Yellow, Warm Grey, Turquoise Blue, Clay, Pastel Green, Cherry Pink, Sap Green, Peony Purple, and Cerulean Blue Light. I also used the Blender Marker to make up some of the colours.

The ribbon was adhered using Mini Glue Dots, and the stamped images using Thin 3-D Foam Tape.

These were fun cards to make, and they turned out just like I expected after seeing the sample in the Ideas Book.

Thanks so much for taking the time to read this, now, hop on over to Wendy's Blog, Paper, Ink & Bling and see what twist she has put on an idea.


Thursday, 4 August 2016

Annual Inspirations Blog Hop

Welcome to our August Annual Inspirations Blog Hop.

This month sees the launch of our brand new annual catalogue, and let me tell you, it is FULL of fantastic products. Just take a look at the close-up of the cover for starters...how beautiful are those paper flowers!


So, this month's Blog Hop is all about the new Annual Inspirations Idea Book. In case you don't know what a Blog Hop is, it's a big circle of blogs, all linking from one to another, all showcasing the same theme. So this month you get to check out everyone's favourite new products, and hopefully get some brilliant ideas and inspiration. If you have come here from Kerry's blog Kerry's Creative Collection then you're on the right track.

So what is my favourite product in the brand new catalogue? Well. I can never ever pass up an organising system. Maybe because I'm not organised, so I keep hoping that this time I really will be. So far our organising products like the Small, Medium, and Large Organisers have been amazing for me, so I'm always eager to see what our head office will come up with next.

Oh my goodness....they have outdone themselves!!!

Close To My Heart have introduced a brand new system called Workspace Wonder. It consists of 6 different modular pieces that can work together in whatever way you choose, to build storage that suits YOUR needs.

There is a stamp pad stack, a marker stack, a tool cubby, and a paper tray, all designed to hold your favourite products. On top of that there is a small tray and a large tray to keep everything together.


See how you can arrange it to suit what you need, in terms of both equipment storage and space. I am in love!

This product is still in production, and will be available a little later this month. Keep an eye on my Facebook page for the announcement, and in the meantime check out pages 88-89 of the Annual Inspirations Idea Book for more details about this AMAZING system.

Now that you've finished drooling over the Workspace Wonder, head on over to Wendy's Paper Ink Bling Blog to see what she likes the most in the new Ideas Book.

Sunday, 5 June 2016

It's winter! Blog Hop

Can you believe how cold it's gotten lately, well, here in Melbourne anyway. That makes it a great time to sit inside and craft away, so I hope you get some inspiration from this month's blog hop about all things Winter!

A blog hop is a big circle of blogs all relating to a theme. If you've come here from the wonderful Cindy's blog. Cindy Scraps, then you're on the right track.

This month I decided to whip up a quick and simple card. Winter is a time when some people get a bit down, and it's nice to let your friends and family know that you're thinking of them, and hopefully bring some sunshine into a dreary day.


I've used a wonderful new technique that I learnt about on the Close To My Heart official Facebook Page. They post wonderful ideas, blog posts, and videos frequently. The technique above uses ink in conjunction with our embossing folders - the video is here if you want to go and have a quick look!

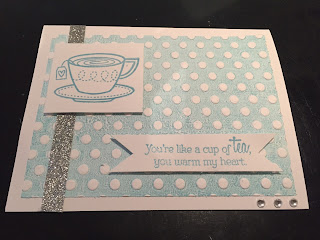
I was so happy with the way this background turned out. I used the Dot Embossing Folder and Crystal Blue Ink. I then stuck that down on my card base.

The stamp set is the Treats Of Friendship stamp set, and I have used heat embossing to make both the image and the sentiment shiny and glossy.


To do that I stamped the images in Crystal Blue Pigment Ink, part of the Whimsy Mini Pigment Pads Set, then covered the wet ink in Clear SuperFine Embossing Powder. I then used a heat gun to set the embossing powder to create the shine.

The card was finished by adding a strip of Silver Shimmer Trim, sticking the stamped images down with 3-D Foam Tape, and adding some Bitty Sparkles in the bottom right hand corner.

Just a note, the Embossing Folders are currently part of the Flash Sale that CTMH is having - every weekend in June there will be a flash sale starting at 7am Saturday and finishing 7am Tuesday if not sold out. There are 1 different sets of embossing folders, with 6 in each, at a savings of over $20 per set! Check them out here: Set 1 and Set 2. A lot of these are going away when the new catalogue comes out at the start of August, so make sure you get what you want now!

Thanks for having a look, now, it's time to hop on over to Alison's Scissors Paper Heart blog and see what she's done...


Thursday, 5 May 2016

It's May...that means....new products!!!

Welcome to our blog hop for May. I'm so excited that this month we're showcasing our favourite products from the brand new Seasonal Expressions 2 Ideas Book. It's always exciting when we get to share the amazing new products that Close To My Heart have come out with, so hopefully this blog hop will give you a great overview of some of the things you can play with.

A blog hop is a big circle, so if you've come from Kerry's blog, Kerry's Creative Collection, then you're on the right track.

Today I want to showcase one of our brand new paper collections and Workshop Your Way Kits. Workshop Your Way Kits are our newest way to make beautiful page layouts and stunning cards, all while taking advantage of the layouts and cutting guides provided by our head office and some talented scrappers and cardmakers. Each Workshop Your Way Kit contains a paper packet, some embellishments, some cardstock, and ideas to make 3 double page layouts, 8 or 9 cards, and a double page Picture My Life layout. There's also plenty of embellishments and paper leftover to use on your other projects too.

Everyone who knows me knows that I am absolutely CRAZY about Disney. I love, love, love it. The theme parks, the cruise line, the movies, just everything about it. So imagine how excited I was to see our new Disney-inspired My Reflections line called Magical. It truly is Magical - the paper packet has those classic theme park colours of red, yellow, black, and white (hmmm....Mickey Mouse colours anyone?), the Complements include a castle die-cut and a Let's Ride title, and the matching sequins are just oh-so-cute.

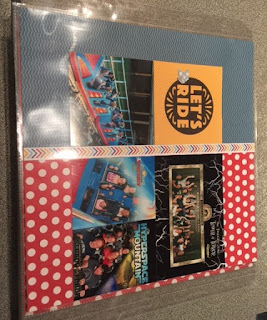
So, what better way than to show you the Magical Workshop Your Way Kit than to complete one of the layouts with some photos from our recent trip to Disneyland. And with a title of Let's Ride, how could I not put some of our ride photos on the page!

Our 7yo daughter is a total thrill-seeker when it comes to rides. She absolutely adores Splash Mountain, but the other thrill rides at Disneyland come a very close second. This layout has space for 7 photos, so I was able to put all the main rides on it.


I do have close-ups of each side, but for some reason they rotate when I place them on the blog. So, if you bend your head to the right (go ahead, I won't laugh!), you should be able to see some more detail :).


 One of the things I love about the Workshop Your Way Kits is that there is no stamping required to complete the layouts as prescribed. Of course, you can always change these layouts to add your own flair, including stamps, if you wish, but if you just want simple and quick then you can copy these exactly with only a trimmer, adhesive, and a pair of scissors. So quick and simple.

Now, I have to say, just because I look at these and see Disney, it doesn't mean that these papers and complements can only be used for Disney. I have already seen a gorgeous layout using family photos shot in Sydney, a layout of a couple going to their high school formal, and some fun layouts of children on play equipment at a playcentre, all using the Magical Workshop Your Way Kit. There are so many uses for this collection - I would love to see what you make with it. You can purchase any of this collection, and anything from our new Seasonal Expressions 2 Idea Book from my website, or by emailing me directly.

Now, I invite you to follow the blog hop circle and see what Cindy has to share in her Cindy Scraps blog.

Thanks for reading!!!

Monday, 4 January 2016

Celebrating Summer Blog Hop

Happy New Year!

And welcome to our first Blog Hop for 2016 - all about Celebrating Summer!


A "Blog Hop" is a circular link between a group of bloggers (in this case my fellow CTMH consultant team members), all showcasing a variation on a theme.  No matter where you start, you can view all our blogs in this blog hop.  If you have come from Helen's blog then you are on the right track.

What do you think of when you think of summer? Yummy fruits? Holidays away? Pyjama Days with no school to worry about? In our family it tends to be all about the pool and sharing fun times with family and friends.

I've been wanting to do something with this cute little 5"x7" Hinged Display Tray for quite some time now, so thought this was the perfect time to showcase some of our Mothers' Group Christmas Celebration (from 2014).

Here is the completed tray in all its glory - firstly standing up, then lying down. I couldn't get a standing up photo in good light because the wind kept blowing it over, but I hope the inside photo gives you an idea of how it looks on display.


I've used some of our beautiful new papers from the Seasonal Expressions 1 Ideas Book (catalogue), as well as some of the matching stamps. 

Let's have a closer look shall we...

In the top left hand corner I have a cool stamp saying Love Summer from the new Beach Days stamp. It coordinates with the Artistry Cricut Cartridge, so I cut the shape out to allow me to stamp it easily. I used some old Baker's Twine that I had, but there are still some other colours available on my website. The paper behind the saying (that does hang when the tray is standing up!) is from our new Penelope range - which I just love. So bright and cheerful! You'll also notice, if you click on the link, that our new paper packets have even more patterns in them - 6 different varieties instead of 3!!! Go have a look :)


The bottom left hand corner also contains stamps from the Beach Days stamp, stuck on with some 3-D Foam Tape to make the images pop a bit.


The bottom left hand corner on the right hand side uses a different paper from the Penelope packet, along with stamps from our new My Anchor stamp set. The My Anchor stamp set is one of 4 new stamp sets that have coordinating Thin Cuts. Thin Cuts are dies that you can use in your embossing machines (like Cuttlebug or Big Shot, etc.), to cut the shapes out for you. I've also used them for the title I've adhered on this side - Oh Happy Day!


The top right hand corner has more Penelope paper, a heart from My Anchor, and a rosette made from yet another Penelope paper.


Here's a final look at the left and right sides up close:


I hope you've enjoyed looking at my small project. Now why don't you hop on over and have a look at Wendy's Paper Ink Bling blog to see what gorgeous creation she has to share!